There’s just something magical about Cookie Monster cinnamon rolls. They’re soft, sweet, bursting with Oreo cheesecake filling, and dyed a playful shade of blue that makes everyone smile. Whether you’re baking them for a kids’ party, a themed brunch, or just because you feel like making something whimsical, these rolls are as delicious as they are fun. The best part? You don’t have to be a pro baker to make them — I’ll walk you through every step so you can enjoy fluffy, bakery-worthy rolls at home.
If you’re into playful, colorful desserts, these rolls are right up there with my Oreo Cheesecake Donut Bombs – Irresistible, Indulgent & Easy to Make. Same fun vibe, but with that cinnamon roll coziness we all love.
Print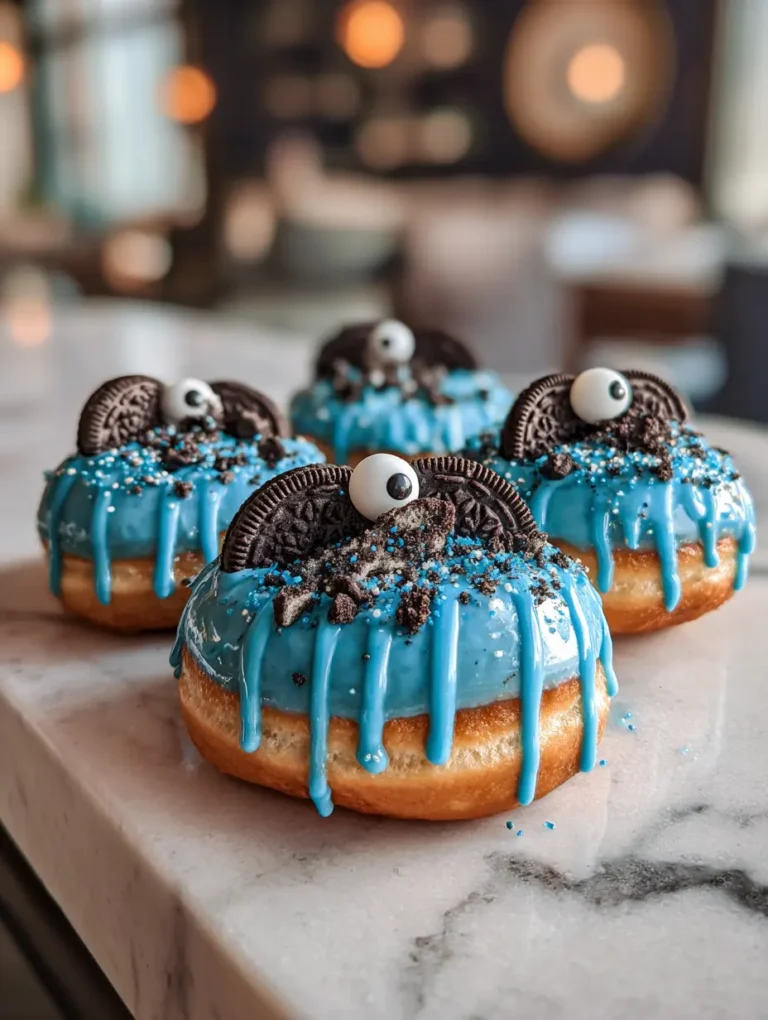
Cookie Monster Cinnamon Rolls
Soft, sweet, and stuffed with Oreo cheesecake filling, these Cookie Monster Cinnamon Rolls are fun, whimsical, and guaranteed to brighten your day. Perfect for parties, brunches, or anytime you want a playful twist on a classic treat.
- Total Time: 1 hour 45 minutes
- Yield: 12 rolls 1x
Ingredients
- 4 cups all-purpose flour
- 2¼ tsp instant yeast
- 1 cup warm milk
- ¼ cup sugar
- ¼ cup butter, softened
- 2 large eggs
- 1 tsp salt
- Blue gel food coloring
- 8 oz cream cheese, softened
- ½ cup powdered sugar
- 1 tsp vanilla extract
- 10–12 Oreo cookies, crushed
- Powdered sugar (for icing)
- Milk (for icing)
- Extra crushed Oreos (for topping)
- Candy eyes (optional)
Instructions
- In a large bowl, combine warm milk, sugar, and yeast. Let sit for 5 minutes until foamy.
- Add butter, eggs, salt, and blue food coloring. Mix well.
- Gradually add flour and knead until smooth and elastic. Cover and let rise for 1 hour.
- Meanwhile, prepare the filling by beating cream cheese until smooth. Add powdered sugar and vanilla, then fold in crushed Oreos.
- After dough has risen, roll it out on a floured surface into a rectangle about ¼ inch thick.
- Spread the Oreo cheesecake filling evenly over the dough, leaving a small edge.
- Roll the dough tightly from the long side into a log. Slice into 1½ to 2-inch rolls.
- Place rolls in a greased baking dish, cover, and let rise for another 30–45 minutes.
- Preheat oven to 350°F (175°C). Bake for 20–25 minutes until lightly golden.
- Mix icing with powdered sugar, milk, vanilla, and blue food coloring. Drizzle over warm rolls.
- Top with candy eyes and extra crushed Oreos for that Cookie Monster look.
Notes
Make sure to let the dough rise fully for the fluffiest results. Use gel food coloring for vibrant blue and don’t skip the candy eyes for that classic Cookie Monster charm.
- Prep Time: 20 minutes
- Cook Time: 25 minutes
- Category: Dessert
- Method: Baking
- Cuisine: American
Nutrition
- Serving Size: 1 roll
- Calories: 320
- Sugar: 18g
- Sodium: 210mg
- Fat: 12g
- Saturated Fat: 7g
- Unsaturated Fat: 4g
- Trans Fat: 0g
- Carbohydrates: 45g
- Fiber: 1g
- Protein: 5g
- Cholesterol: 40mg
Keywords: cookie monster cinnamon rolls, Oreo cheesecake rolls, blue cinnamon rolls, fun kids dessert, brunch treat
Table of Contents
Why Cookie Monster Cinnamon Rolls Are So Irresistible
A delight that’s just as enjoyable to see as it is to savor.
These cinnamon rolls have it all — the comforting warmth of fresh-baked bread, the creamy tang of Oreo cheesecake filling, and the cheerful pop of bright blue dough. They’re an instant mood booster. Kids love them because they look like a character straight from TV, and adults can’t resist the nostalgic cookie-and-cream flavor.
Perfect for special occasions
Whether it’s a birthday breakfast, a bake sale, or a themed movie night, Cookie Monster cinnamon rolls will steal the show. They’re easy to customize, too — swap the Oreo filling for chocolate chip cookie dough if you want to try a twist, much like I did when experimenting with my Pumpkin Spice Babka Loaf.
Ingredients You’ll Need

Here’s everything you’ll need for these playful rolls:
Ingredients for the Dough Base:
- All-purpose flour
- Instant yeast
- Warm milk
- Sugar
- Butter
- Eggs
- Salt
- Blue gel food coloring (or natural alternative)
Oreo Cheesecake Filling Ingredients:
- Cream cheese (softened)
- Powdered sugar
- Vanilla extract
- Crushed Oreos
Topping Preparation:
- Blue icing or glaze
- Candy eyes (optional but fun)
- Extra Oreo chunks for topping
I like keeping my ingredient lists approachable and easy to find. If you’ve made my Decadent Croissant Casserole with Lemon Curd and Berries, you’ll notice I’m all about balancing bold flavors with familiar pantry staples.
How to Make Blue Dough

Using food coloring for bold results
The easiest way to achieve that iconic Cookie Monster blue is with a high-quality gel food coloring. It blends evenly into the dough without affecting the texture. Add it during the kneading stage to ensure the color is distributed throughout.
If you feel like switching things up, you can even take this recipe in a sweet-and-savory direction — kind of like I did with my Egg Roll in a Bowl – A Quick, Healthy, and Flavorful Weeknight Dinner. It’s unexpected, but totally delicious.
Natural alternatives to food coloring
If you’d rather skip artificial dyes, you can use butterfly pea flower powder for a softer, more natural blue. Just keep in mind that the hue won’t be as vibrant. Similar to when I experimented with ube in my Best Ube Cheesecake, natural colors add a unique charm even if they’re subtler.
Making the Oreo Cheesecake Filling
The heart of the Cookie Monster flavor

If the blue dough is what catches your eye, the Oreo cheesecake filling is what keeps you coming back for seconds. It’s rich, creamy, tangy, and studded with chocolate cookie crumbs.
You’ll need:
- 8 oz cream cheese, softened
- ½ cup powdered sugar
- 1 tsp vanilla extract
- 10–12 Oreo cookies, crushed
Step-by-step:
- Beat the cream cheese until smooth and fluffy.
- Add the powdered sugar and vanilla, mixing until fully incorporated.Best restaurants near me
- Fold in the crushed Oreos, leaving some chunks for texture.
It’s similar to the filling I use in my Cherry Yum Yum Recipe, where a creamy base meets a cookie or crumb layer — it’s a classic pairing that always works.
Rolling, Shaping & Proofing
And if you’re the kind of baker who loves working with rich, aromatic dough, you’ve got to try my How to Make Lemon Sweet Rolls That Everyone Will Love. The smell alone is worth it.

Assembling the rolls
After the dough has risen, roll it out on a lightly floured surface into a rectangular shape about ¼ inch thick. Evenly spread the Oreo cheesecake filling over the surface, leaving a small margin around the edges to avoid spillage.
Rolling for even spirals
Starting with the longer side, roll the dough tightly into a log. Cut it into 1½ to 2-inch slices using a sharp knife or unflavored dental floss. Arrange the slices in a greased baking pan, leaving a bit of space between each one so they have room to expand.
The secret to fluffiness
Loosely cover the baking dish with plastic wrap or a clean towel, and allow the rolls to rise a second time until they appear puffy — this typically takes 30 to 45 minutes. Don’t rush this step! Just like with my Mini Beef Wellington, patience during proofing makes all the difference in the final texture.
Baking to Perfection
Oven temperature and timing
Preheat your oven to 350°F (175°C). Bake the rolls for 20–25 minutes, or until the tops are just starting to turn golden. You don’t want to overbake, as that can dry out the filling.
Knowing when they’re done
A kitchen thermometer is your friend — aim for an internal temperature of around 190°F (88°C) in the center roll. That’s your sweet spot for soft, fully cooked dough without dryness.
They’re absolute heaven when served warm, but here’s my little bakery secret: bake them just shy of done, let them cool, then reheat and glaze right before serving. It’s the same move I pull with my Oreo Cheesecake Donut Bombs, and trust me — it never fails to impress.
Decorating Like Cookie Monster
Blue icing magic
While the rolls are warm—but not too hot—drizzle them with a blue icing or glaze. To prepare it, whisk together powdered sugar, a bit of milk, vanilla extract, and blue gel food coloring until the mixture is smooth.
Adding the “eyes”
For the full Cookie Monster vibe, add candy eyes while the icing is still tacky. No candy eyes? Just use white chocolate chips as the base and mini chocolate chips for the pupils.

The finishing touch — cookies on cookies
Sprinkle extra crushed Oreos over the top. That way, every bite has both the softness of the roll and the crunch of the cookie. This decorating fun reminds me of how I top my Cream Puff Cake — presentation matters just as much as taste.
Storage, Freezing & Reheating
Storing for freshness
Keep leftover rolls in an airtight container at room temperature for up to 2 days, or in the fridge for up to 4 days.
Freezing before baking
Shape the rolls and arrange them on a baking sheet, then freeze until firm. Once frozen, move them to a freezer-safe bag. When you’re ready to bake, let them thaw in the refrigerator overnight, then allow them to rise and bake according to the original instructions.
Freezing after baking
Fully baked rolls (without the glaze) can also be frozen for up to two months. To serve, simply reheat them in the oven at 300°F until they’re warmed all the way through, then add your decorations. This is the same approach I use for make-ahead prep in my Cherry Yum Yum Recipe.
Variations & Fun Twists
Cookie-themed ideas
- Double Oreo: Add mini Oreos inside the filling and on top.
- Chocolate chip monster: Swap Oreos for chunks of chocolate chip cookies.
- Birthday cake rolls: Mix rainbow sprinkles into the filling for a festive surprise.
Seasonal adaptations
- Halloween: Use orange icing and candy eyes.
- Christmas: Swap the blue for red and green glaze.
Much like my Pumpkin Spice Babka Loaf, a simple change in flavor or decoration can make the recipe feel brand new.

FAQ – Cookie Monster Cinnamon Rolls
Yes, for an easier option, you can use store-bought crescent or cinnamon roll dough. Just add blue food coloring and spread the Oreo cheesecake filling inside.
Natural alternatives like butterfly pea flower powder can give a blue tint, though it will be less vibrant.
Cream cheese, sugar, vanilla, and crushed Oreos create the perfect balance of tangy and sweet.
Yes, shape the rolls and freeze them on a tray until they’re firm, then move them to a storage bag. Let them thaw in the refrigerator overnight before baking.
Don’t rush the rising times, and make sure your yeast is fresh for maximum lift
Conclusion
These Cookie Monster cinnamon rolls are more than just a sweet treat — they’re pure joy in baked form. With soft blue dough, creamy Oreo cheesecake filling, and playful decorations, they’re a hit for both kids and adults.
Whether you bake them for a birthday breakfast, a bake sale, or just because you want to brighten someone’s day, these rolls are guaranteed to get smiles. And the best part? You can adapt them for any occasion, from festive holiday colors to new flavor combos.
And if you’re still craving more creative roll recipes, don’t miss my How to Make Cinnamon Roll Waffles That Will Blow Your Mind or my Best Chocolate Chip Cookie Recipes for Every Occasion. They’re perfect for a dessert table that’s as beautiful as it is delicious.
From my kitchen to yours — happy baking, and may your Cookie Monster cinnamon rolls be as fluffy, sweet, and fun as you imagine.